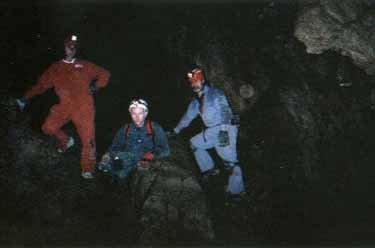
 Too little light, from the wrong direction.
originally printed in The Canadian Caver, #56, 2000
*Point-and-Shoot*
your way to better cave pictures!
Ian Drummond, Alberta Speleological Society
I'd like to offer some suggestions to make those cave pictures even better; a little brighter, sharper, better to use when boasting to your friends.
Too little light, from the wrong direction.
C aves are dark, really dark. That little flash on the camera can barely make it out to 10 feet away from you. Not only that, the flash is right by the lens, so there are no shadows in your picture, and any mist in the air just blows the light right back into the camera lens. Your pictures are cloudy, colours are drab, there is no contrast. My three friends in the Grand Gallery are barely recognizable.
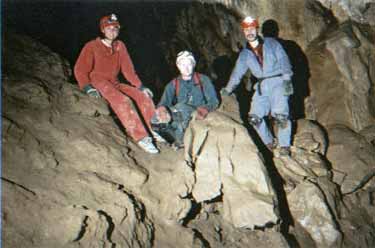 More light, from the side.
A n extra flash gun will add more light. Visit a photo shop and find many different types for sale. The cheapest is probably the best for this purpose. You definitely do not want a fancy unit custom-built for a particular camera. An automatic exposure sensor on the flash itself, is useful. Size and weight is important too, you probably won’t take it if it is bigger and heavier than your camera!
Check out garage sales - the type of basic flash gun we are talking about is sometimes available there.
When the extra gun is used to give more light from the side, the results are dramatic. (-Left) I took a second photo of my friends in the Grand Gallery with a small flash held at arm's length to one side, pointing at the people. Judge for yourself if the second photo is better - my friends tell me they think they are more recognizable, better looking and just plain having a better time in the second photo!
Get yourself a slave!
W ait a minute! How was the second flash fired? You can’t just hold the flash out to one side and somehow expect it to go off by itself. A second, small piece of equipment is needed. It is called a slave or trigger unit. It responds to the light from the flash on the camera, and fires the second flash at the exact same moment, when the shutter of the camera is open. Slave units are sometimes sold in regular photo shops, but these commercial units are generally inadequate for cave use, they are not sensitive enough, yet are set-off accidentally by the lights used by the cavers to find their way around.
Fortunately there is a “cave slave” available, which can be bought ready-made from Firefly Electronics in the UK or in the USA, or made from an electronics kit ( from David Gibson directly). The Alberta Speleological Society (www.caving.ab.ca) occasionally has slaves built from the kits available.
The slave is housed in a sealed, clear container, about the size of a 35 mm film canister. It connects to the second flash, usually by a “hot-shoe” connector. It is sensitive enough that no particular care is needed to aim the sensor. Indeed it is readily and reliably fired around corners, or hidden behind people.
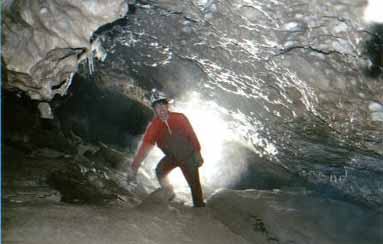 Hot and steamy cave pics!
I f it is so easy to move the extra flash gun around, how about trying some different shots? Remember the mist and steam that is so common in cave photos? Well we can use it to our advantage. Put the extra flash behind your friend, pointing towards the camera. Now any steam rising from that hot body will catch the light and surround your buddy with pure radiance.
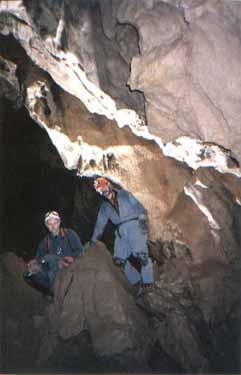
‹- Even cool characters like my friends, waiting patiently in the Grand Gallery, look better when the ceiling and walls catch the light from an extra flash placed behind them on the ground, pointing up at the roof .
Hold your breath and look them in the eyes!
A little steam and mist may be good around
your friends, but not around the camera. Hold your breath! I mean
it. You don’t want a cloud of condensed halitosis just in
front of the camera. Keep your mouth shut when taking pictures
in a cave.
And as for your friends, make sure you can see their faces. Get
them to look at you over their shoulder. Ask them to look up so
the brim of their caving helmet doesn’t put their eyes in
shadow. They look better that way, and they might even go caving
with you again if you give them pictures where their mothers can
recognize them.
Good Luck, and happy snapping!
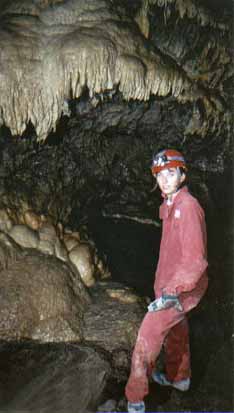
More pictures to illustrate the effects of the extra
flash.
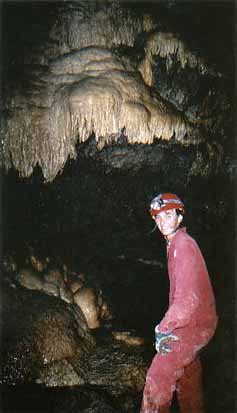
Far Left - The basic point-and-shoot. The figure is clear, but there are only hints of the interesting cave formations behind.
Near Left - The extra flash to the side starts to show up the pool, the flowstone, and the draperies above.
The extra flash behind the person makes them stand out. The light has also caught the edge of the draperies and glistens on the flowstone floor.
Technical stuff.
T he photos shown here were taken with a Kodak Advantix camera purchased for $19.99. The camera was loaded with 25 exposures of 400 ASA film, and has an approximately f11 fixed-focus lens of unknown focal length. The extra flash was a Starblitz 2000 BTZ, a basic electronic flash widely available under many different names in camera stores for approximately $30. It has a guide number of 160 feet for 400 ASA film. The slave trigger unit was made by the author from a kit purchased from Dave Gibson, the designer in the UK.
This site created Sept '95,
Updated .